This article was written by Jared Banks in 2016
When designing by hand, the steps to starting a new project are simple: grab a writing implement, a surface to write on, and start being creative. As long as you have a pencil, pen, crayon… and a notebook, napkin, scrap of plywood… you are ready to go. If you are doing production drawings by hand (please tell me very few people still do this), the process isn’t much more complicated. You select a sheet of velum or mylar with your title block pre-printed on it, add a few details to the title block, and pick where you want to start.
Archicad and BIM are of course different. Sure you can launch Archicad and get to work. But that’s ignoring the power of the tool. There are a number of things you should do when you start a new project. The major first step is what you open when you launch Archicad. One could literally launch a blank file, one with nothing in it and start working. But there would be so much to do. A true Clean Template is an experiment and a educational tool, not a starting point. You could also open your most recent project, do a save as, delete the building and start your new project. Hopefully no one does that anymore. For so many reasons, which will hopefully be made more clear throughout this article, that is a crude and unstable way of working.
Templates!
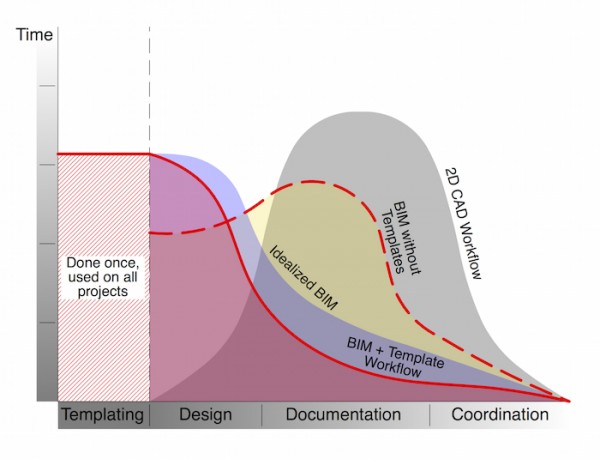
Using an Archicad template is the first step to starting a project. I’ve said it a million times: templates are the key to BIM success. Hopefully you’ve read my recent article on BIM bankrupting firms. But to drive the point home, here’s my favorite diagram from that post:Accepting the power and importance of templates, one could say that starting a new project is “Open Archicad, chose your template, and get to work.” But having a template is not the same thing as a project initiation process. While templates provide a lot of the basics you need when you start a file, there are still a number of things we can not yet automate in Archicad and a number of actions we can’t embed into a template. Fortunately these are often processes we can document and do mindlessly very early on. A project typically starts with a given site and a rough understanding of some key features: square footage, number of stories, etc. These are all clues that can be used to block out plans, elevations, and even sections before a project is designed. All these pieces should already be in your template, but will rarely be sized properly. Furthermore you might have two (or more) standard sheet sizes and need to pick the right one for the project. Doing all this right away saves time later. And it also offers greater rewards.
I recently did the as builts for an addition I’m working on with westerbeck|architecture. When documenting the project, I focused on the model—which makes sense since that’s the foundation of the design process. You might remember the project, as I used it as a foil to discuss Surfaces in the 3D window and to share my techniques for modeling control joints. When we went to bill the client, Cary asked me to send over a set of as-built documents: plans, sections, and elevations. You know the stuff we used to produce as THE GOAL of existing documentation. I completely spaced on creating the drawings. I was so focused on getting the data organized and to a point that was useful to us architects, that I forgot that when we send the client a bill, it’s nice to also send them some product. No big deal. The model was good and my template already had all the views ready to go. I just needed to shift them on sheets, do a little clean up, and finish some other house keeping. It took me less than an hour to get the sheets and drawings ready. I of course also added some pretty renderings, since they were easy to generate. I provided more, in less time, even though I forgot about the drawings.One of the lessons from the project above is that I should have had a checklist for project initiation—a list of tasks that should always be completed before design starts/by the end of the existing conditions phase of the project. Below is my list of things to do when starting a project. Depending on the scope and scale of a project, you might not need to tackle ever point on the list. If you have one-hundred hours on a project you can’t spend twenty on a BIM execution plan. But you probably can spend one or two, maybe more. If you have one-thousand hours, spending a week on getting the project ready to go is absolutely worth it. If you are about to start a multi-year project with tens or hundreds of thousands of dollars in fees, that is very different than if you have forty hours to do a garage or kitchen. Both are valid BIM projects. But the scale of start up is quite different.
12 steps for starting a new project in Archicad
If you want more information about any of the points below, leave a comment. I’ll add links to future articles I write or that others have written/will write. As you’ll see a lot of the points need posts unto themselves. Also, it’s worth pointing out that I’ve listed the steps in the order you should do them.
One more thought before we get to the list: these project initiation steps are very different from the old way of working. Steps 1-6 are essentially invisible to the untrained eye. You’ll put in time and effort into your project with nothing visual to show. Do not worry. Everything you are doing is important and will save time later. Do not skip these steps because you feel the desire to show progress. Remember BIM is different than the old ways. Look again at the graph at the beginning of this article. We are focusing on the time immediately on both sides of the vertical dashed line.
- Update your template. If you aren’t the keeper of your template, ask the person who is for the latest version, and details about what’s changed. Hopefully they’ll have something written down for you to read. Also provide feedback to that person, maybe towards the end of your previous project, rather than last minute at the start of the new one. If you are the keeper of the template, spend time now before a new project to incorporate lessons learned. Even if it’s something very minor (an error in the creation of an Attribute, a new Favorite, something that can be streamlined), update the template before starting the next project. Five minutes or an hour at the start of the project will benefit all subsequent projects. Always thinking about the template before starting a project is good business.
- Project Info. Project Info is the foundation of data in your project. Fill out as much of this data as possible. Some of it will be needed for the Title Block, other parts will be useful as typical data, like for the site plan. Don’t forget that you can add to the pre-existing list. Spend the time to also fill out the client information. ARCHICAD is a great place to store their contact info. If your client’s name, e-mail, phone number, etc. is a part of the file, then you can easily find that information now and in the future. And so can any of your coworkers and collaborators. Finally, by putting client, site, and project data in the Project Info, you make searching for that sort of data across your entire body of work easier, as it’ll be in the same place, displayed the same way, on all projects.
- Title Block. Make sure all the info you need is in there, linked, and displaying properly. Add images, logos, and stamps; if these aren’t in your default template, get them in at the start of the project. It’s best to have this info in on day one rather than wait until you’re scrambling to get drawings out the door. Set your title block up for the phase of project you are doing (no stamp, not for construction notes, etc.). A good template will have all your title block information linked to Project Info, but you still need to check to make sure text is wrapping properly, etc.
- Project Location. Just like you set up Project Info, take the time to set up the project location. Find the right longitude and latitude. Set project north correctly. This will prevent errors when doing visualization.
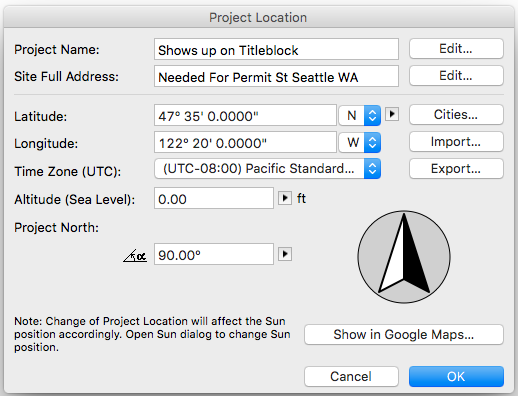
- Project Origin. Here’s an article that talks about Project Origin. Make sure your model has a logical relationship to ARCHICAD’s origin point (0,0). Will the Project Origin be the corner of the building or site? Or some other critical reference point? The primary reason for this is that it helps with model exchange (if both you and the structural engineer have the same 0,0, then life will be better). Also if you are dealing with COBie or other BIM standards, a coordinate system matters. Rob has more on that here. Thinking about Project Origin is also about preparing yourself for the future. Making sure our virtual buildings relate sensibly to a known grid and coordinate system is only going to get more important over time. Drones and robots: need I say more? Also if you want to get REALLY technical, I believe the longitude and latitude you set in Project Location is actually the 0,0 origin point.
- Grid Lines. Personally I haven’t done a project with a grid in years and years. But that’s a symptom of my projects, not the value of grids. Set up a grid on day one. Even if it changes, create a starting point and have it relate properly to the Project Origin. Of course let things evolve, but do so in a manner that makes your life easier, not harder. There’s nothing more annoying than a grid system that is all exceptions and has no relationship to the site.
- Site. This should be a combination of 1D, 2D and 3D. If you have a survey and/or accurate vector based data (dwg, explodeable pdf) add that to the file. If you’ve documented the site by hand or robot, draft it up. Add aerial data from Google or Bing Maps. Grab info from the local municipality. There’s a ton of easily accessible site information online. Find it and add it to your file. Or at the very least, get the data and put it in a folder on your computer/server/wherever you keep your files. If you don’t have good data, put it in loose and make note of that (via smart use of IDs). If you don’t have accurate topographical info, build a mesh that approximates the site, but give it the ID of “temporary” or “sketch site” or “inaccurate” or something that reminds you that this is just a placeholder. So perhaps “placeholder” as the ID. Why am I suggesting you model something that you don’t know? So that you have something for your more accurate model to sit in, context for your initial model sketches. At this time also include trees, neighboring buildings and other important context that you can loosely place—or accurately, if it’s worth doing so. Remember, this is all important information for the beginning of design.
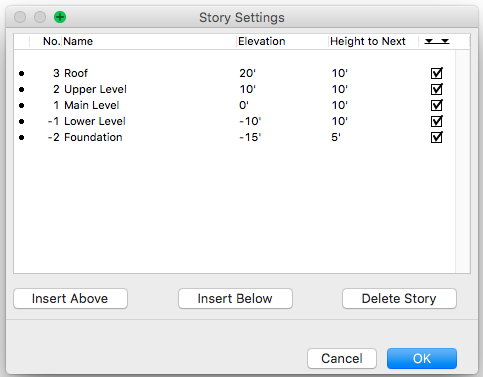
- Stories and Reference Levels. If you know anything about story heights (because you have existing conditions or assumed construction constraints), set them before you start modeling buildings. It’s not hard to fix this later. It’s just annoying. You should have set Altitude under Project Location, but now’s the chance to set other useful Reference Levels. This can be updated later, but the beginning of the project is a good time to think about it.
- Existing conditions. If you are working with an existing structure, model it. And model it well. Remember to set your Renovation Status and Filters correctly.
- Set up your Layouts and Views. One of the best parts of doing documents in BIM is that you can create a cartoon set on day one and have it cover the majority of the project. Even before you know the specifics of the project, you can make an educated guess about what drawings and sheets you need. Set them up, even if they are blank. As you add data to the project, these views will begin to populate. Your template probably already has much of this set up, but it’ll need adjusting as not every plan or elevation or section is the same size—nor are they always the same scale as your template suggests. Once you have your site and existing conditions in the model, you should have enough data to properly layout all/most of the non-detail drawings.
- Delete the parts of the template you know you don’t need. This is a tricky piece of advice. Don’t delete Attributes, as that will cause trouble. Delete Layouts, Views, and Viewpoints that you don’t need. Your template is probably a bit general. That’s good. A template needs to cover a variety of project types and scales, so it will inevitably have more stuff than you need. Judiciously deleting some of this excess will make navigating and growing your file throughout the life of the project more manageable. Assume you will delete something you shouldn’t. That’s okay. You can add it back. Find the balance of deleting enough that you give the file room to breath without going wild and forgetting that you actually probably do need those schedules…eventually.
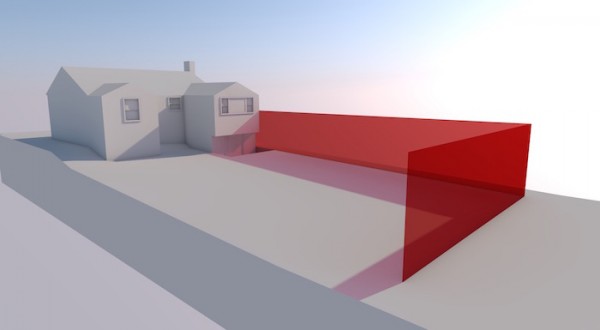
- Invisible forces. This is an easy one to ignore, but very important. Model setbacks and other restrictions to the site. If there’s a height limit, model it. When you are in the early stages of a project, you are probably investigating this information. Adding it to Archicad will help you keep track of it and make sure you don’t forget to continue to design with them in mind. I recently was caught by this. I modeled the side and backyard setbacks, but not the height restriction. As a result I had to alter a roof pitch after the permit office caught my goof. Fortunately everything was modeled, so changing the roof pitch from 6:12 to 5:12 and lowering the truss heel height by 3″ was amazingly easy (had this happened ten years ago, I would have had to fake it with altered notes or eaten a lot of time).
Stop and Save!
Once you have all this done stop, and save a backup. Clearly label the backup (or the folder it’s in) and keep it safe. It’s important to always keep a file from the end of each phase, but this starting point file is extra critical. By the time you’ve reached step 12, you have spent a lot of time thinking about the baseline data of the project. From this point on you will focus on other things and get distracted. Being able to return to this point days, weeks, or years later will be useful to make sure things didn’t accidentally (or purposefully) change.
The above twelve steps pertain to just about every project—perhaps if you’re spending ten hours doing a bathroom remodel you could skimp on a few of the site context steps. As mentioned earlier in the article, factor in the scope and scale of your project. Understand the essence of what must be done. Know when to quit. Know when more data isn’t always better. Also remember that there are a few other items on the to do list if the project is bigger or involves legitimate collaboration (I don’t consider exchanging dwgs with one or two consultants something that requires extra forethought). These additional steps probably can be summed up with: establish a BIM Execution Plan. But there are a few points which I think are worth highlighting.
- Establish if there’s a BIM Standard you need to follow. Here are USA and UK examples. If there is, make sure your template and/or file conforms to it by step 12 above. This might mean adjusting Layers and other Attributes, among other things.
- Understand data exchange with consultants. Will it be dwg, ifc, .pln, BIMx, something else? Make this decision a group effort and run some tests. It’s easier to find errors in translation with a simple test than with a full-blown model about to enter construction documents. Furthermore, if you tackle data exchange criteria on day one, you can start exchanging models from the very beginning of the project. We all think about clash detection and model validation as we approach construction, but there’s no reason not to start a variety of collaboration and coordination tasks with the first sketch models.
Final Thoughts: or actually, not final thoughts
This post grew out of two articles I wrote in 2015 about unnecessary fixes. The comment section of the first post is essentially a post unto itself, and much of the discussion focused on what to do when starting a project. Unnecessary fixes are often caused and avoided by project start up processes.
What am I missing?
What else should we do before diving into a project in Archicad? I know I’ve missed things in the list above. That’s okay. I don’t expect this post to be complete until you all start adding advice in the comments. There are plenty of other important project initiation tasks, like identifying your internal team, external consultants, etc. This post didn’t cover those tasks—both because they are mostly external to Archicad and because they are much more dependent on project type, scope, and scale. I’m curious about the steps you do outside of Archicad, so feel free to mention those below as well as what we do in/with/because of the program.
Are you following GRAPHISOFT North America on Twitter? Click Here to keep track of all the latest Archciad News in North America
You might also like:
More Articles:
Archicad
Customer Stories
Education
Industry News
Tips, Resources + Downloads
Webinar Recordings